With everything installed let's begin. Our order of tasks will be, configure the OSX firewall, startup and configure the sharing services in OSX, configure the XP firewall, and map a drive in XP. For this example, the host OS' host name will be 'macbook-pro-17' and the guest OS' host name will be 'macbook-pro-xp'.
Step 1
OSX Firewall Configuration
Start by running Flying Buttress. If you connect to the network via Ethernet and Airport (or alternate between them) we will need to create multiple rule sets. In addition, if you had already configured your firewall using the built in firewall controls, you may need to add those entries here. Refer to the Flying Buttress docs and support sites for more information on the latter. For this example, we are simply trying to share SMB in a relatively secure manner. With that aside, start by adding two firewall rules:
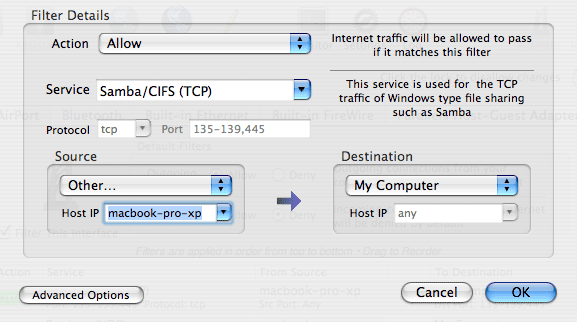
Click Add Filter and enter the following:
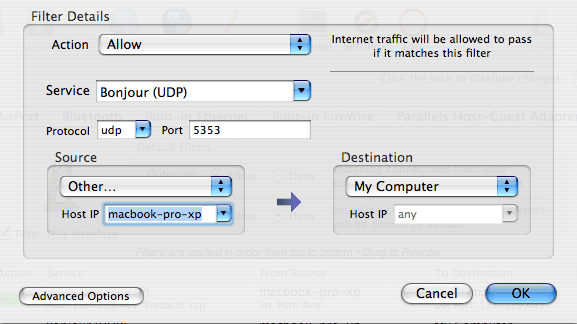
Add another filter, but this time choose Custom Service and type in the name 'Bonjour (UDP)'.
You should now have these two rules in your setup:

If you use the wired Ethernet adapter, repeat these steps on that tab as well.
At this point, your firewall is configured.
Step 2
Turn on SMB sharing
Nothing fancy here, just use the Sharing preference and toggle on the Windows Sharing option as shown.

Step 3
Configure the XP firewall
If the entry for Bonjour is not already in the firewall, it will need to be added.
1) Begin by opening up the firewall configuration in XP. This can be found either through Start -> Control Panel -> Network and Internet Connections -> Windows Firewall (in category view) or simply Start -> Control Panel -> Windows Firewall (in classic view).

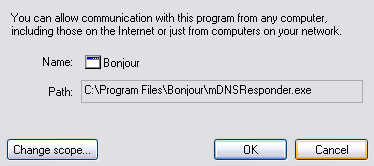
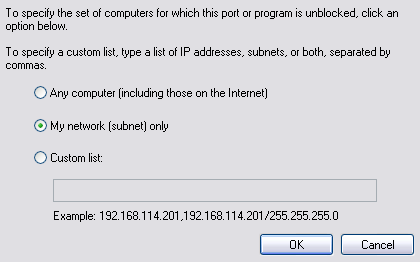
2) Click the Exceptions tab and see if Bonjour is in the list. If not, click 'Add Program' and browse to and select 'C:\Program Files\Bonjour\mDNSResponder.exe' (assuming the default install path). While you are there, click the 'Change Scope' button and select the 'My Network (subnet) only' radio button. This will then only allow the bonjour traffic to the local network you happen to be on which is more than enough for our purpose.
You should now see something like the following (ignore the other ones in the displayed list - you may or may not have some of them):

If you want to share from XP to OSX, then enable the File and Printer Sharing also but again, change the scope to the local network to minimize the exposure.
Step 4
Map the OSX drive in XP
At this point it is possible to map to our home folder (the default share in OSX) but for this example let's map to a separate share in OSX.
1) To begin, create a new 'test' share using SharePoints (System Preferences -> SharePoint). You should end up with something similar to the following:
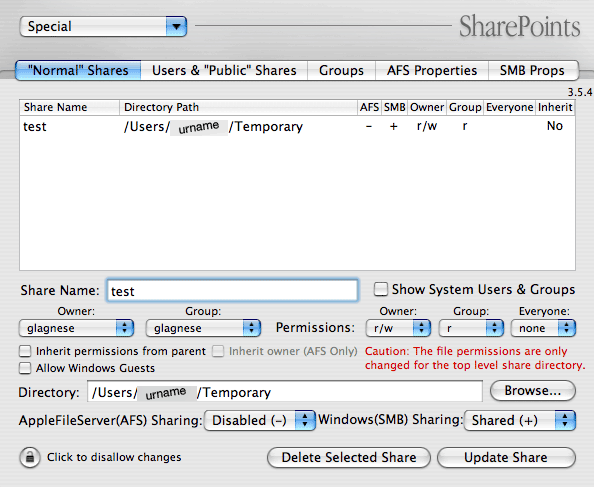
In this example, a Temporary directory was created inside the user's home directory - feel free to use any other directory but keep the share name as 'test' so the rest of these instructions make sense.
2) Back in XP, open any folder and choose 'Tools -> Map Network Drive...' then pick a drive letter (O in the example) and enter the bonjour name for the resource: '\\' followed by the bonjour host name, 'macbook-pro-17.local', followed by the share name '\test'. Or browse for the local name and select the test share found there.

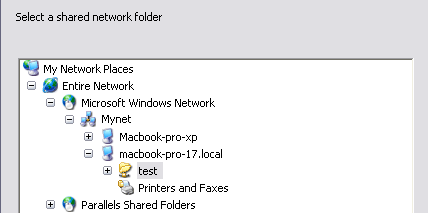
Click okay and you are now connected.
|